- Home
- Posting a New Event
Posting a New EventWhat follows are step-by-step instructions that can be used to post a trip/class proposed by an organizer. For big events there are additional steps, and for announcements there are fewer (please see the "Special Cases" section at the bottom of this page). Wild Apricot's documentation on events can be found at their online help. Here are the Wild Apricot links for all things events, and the specific page on setting up events. And don't forget to look at existing events in case you want to see how someone did something similar to your desire.Summary
Details
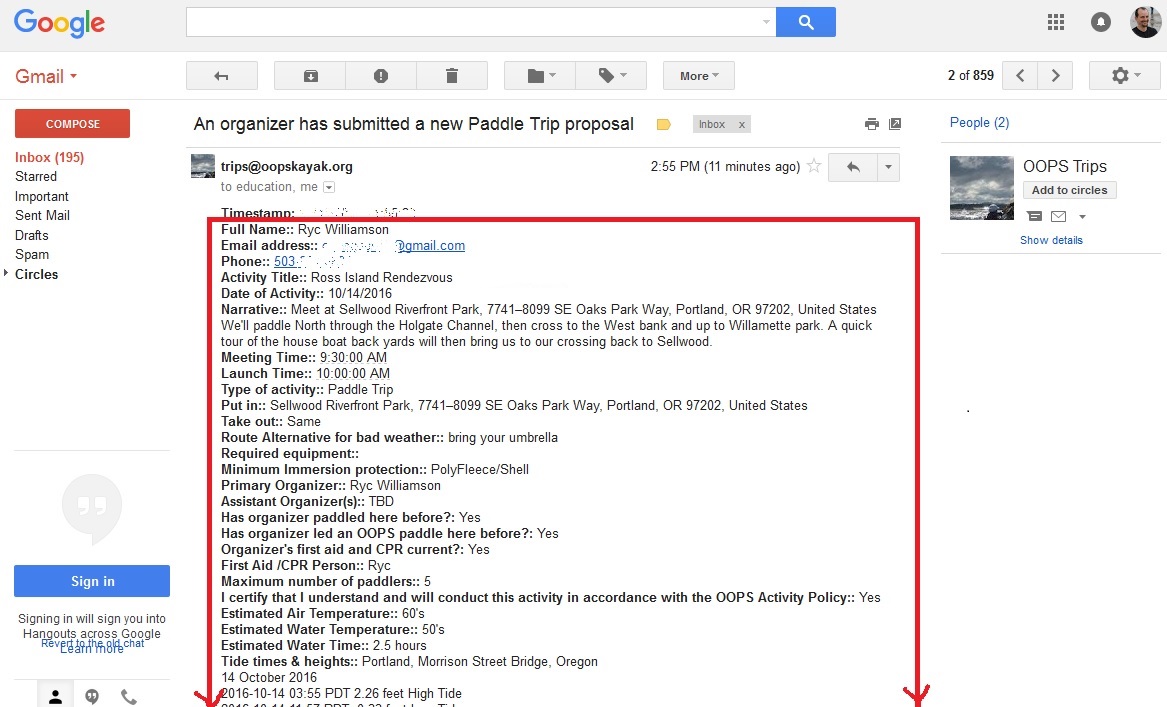
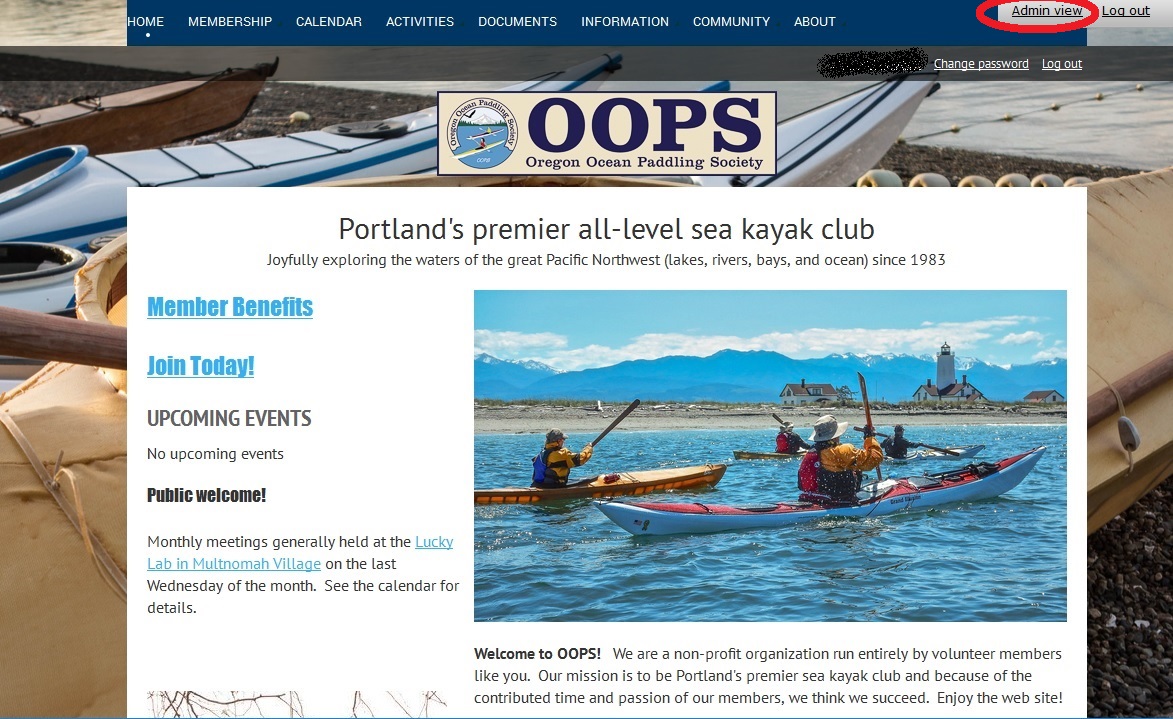
1. A new trip/class is proposed: The Trips Board member (and delegates) will an e-mail titled "An organizer has submitted a new Paddle Trip/Class proposal." Note: If you only get a "Someone has responded to Trip Proposal Form" e-mail, you'll need to extract the event information from the spreadsheet and continue to step 3. See this page for how to do this. 2. Copy out the Details from the Proposed Event: Open the "An organizer has submitted a new Paddle Trip/Class proposal" e-mail and copy out the details. 3. Save the Event Data: Open a blank document in your favorite word processor on the computer you were using to view the spreadsheet in the previous steps and paste (by "control/command-V") the copied data into the blank document. Hang onto this - we'll need it later 4. Log into the OOPS website at http://oopskayak.org/ using an administrative account like Trips, Events, Education, or Membership and go to the Admin view: Click the button on the upper right:
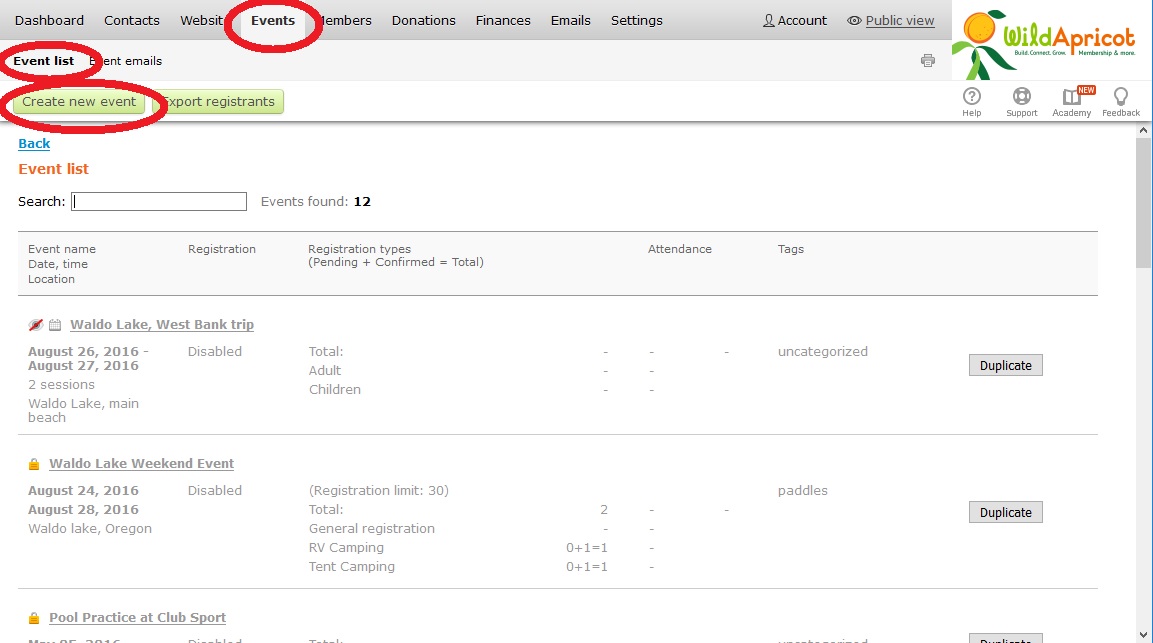
5. Create a New Event: Once at the Admin dashboard, click on the "Events" menu category, select "Event List," and then click "Create new event". Choose "Advanced Event" (simple events are RSVP only - they do not allow registration - great for general meetings)
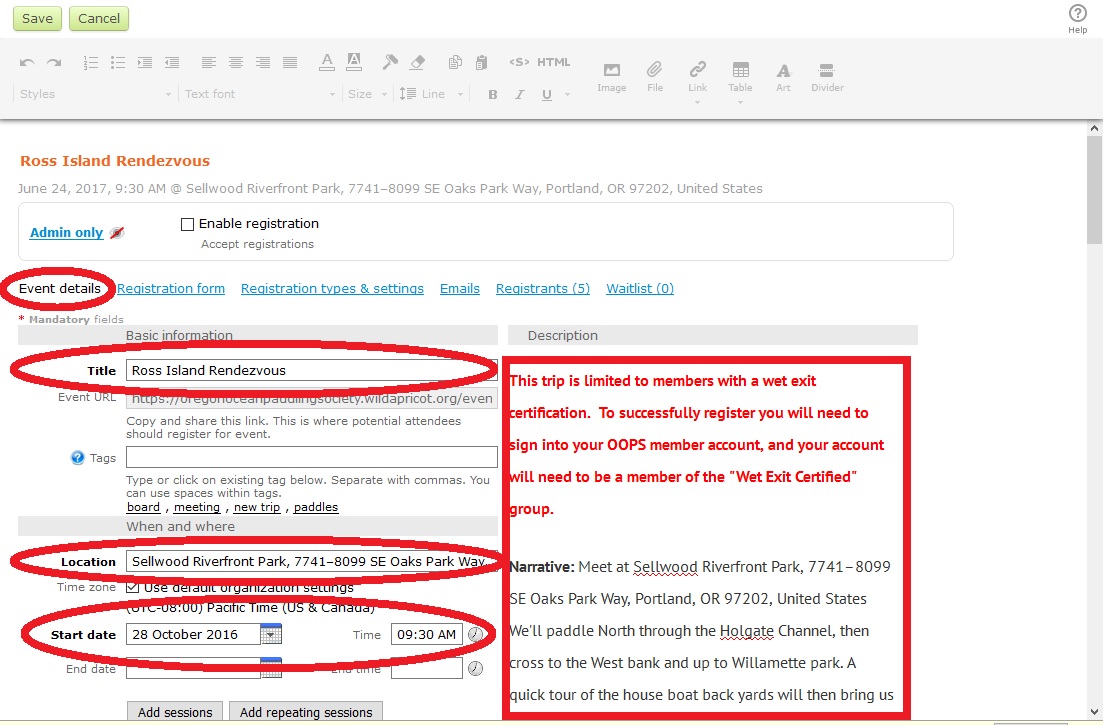
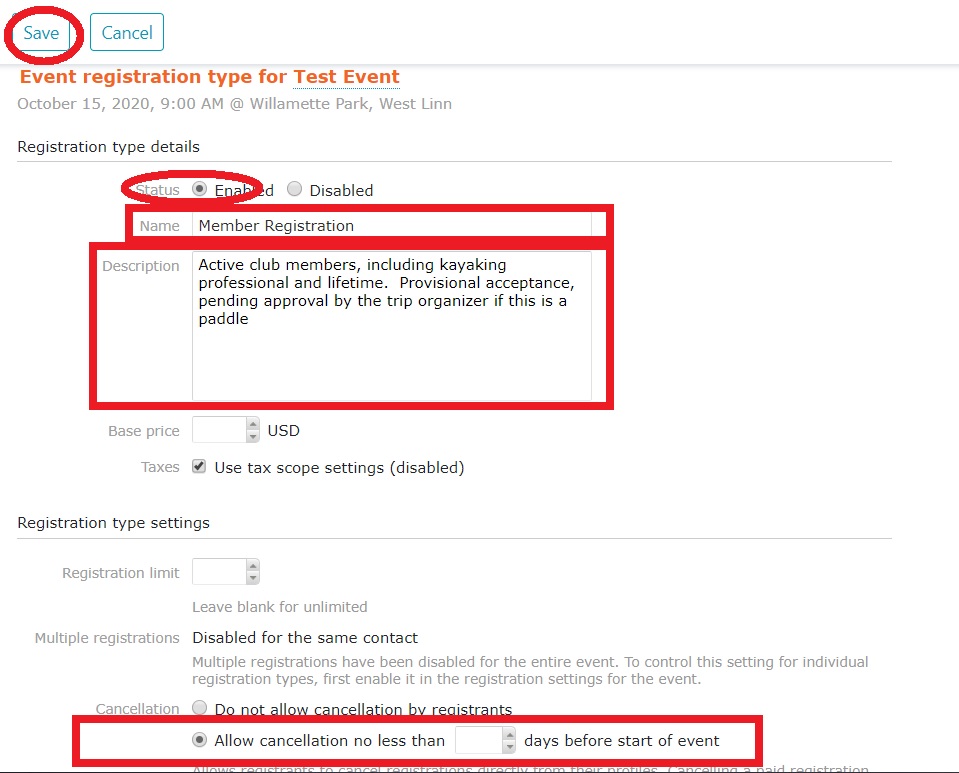
6. Start setting up the event the organizer proposed. Make sure that "Event Details" is black, and now fill in the Title, Location, and Start Date/Time of the event (for the Time, use the "Meeting Time" specified in the organizer's narrative, not the "Launch Time") proposed by the Organizer. Next, go to the document containing the text from the spreadsheet you created in step 3, and copy/paste everything from "Narrative" to "Rating Comments" into the "Description" field in the event (please read the note below too). Please do NOT leave the Organizer's name, e-mail, and phone number in this description - that's only for you, the Event Coordinator, in case you have questions/concerns about the proposed event. NOTES:
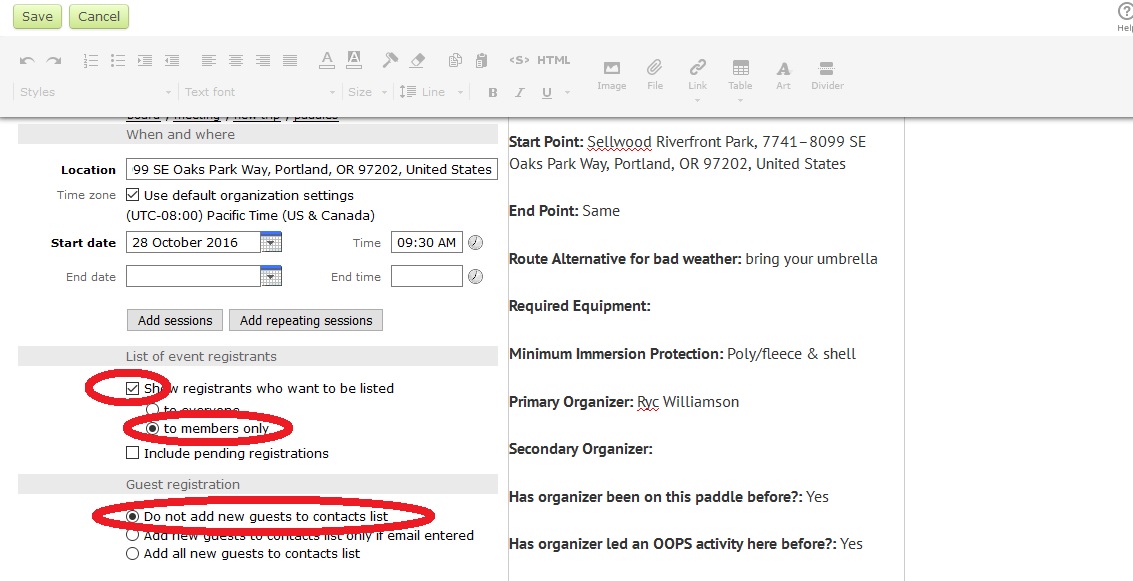
7. Fill in the rest of the event details on this page: click "Show registrants who want to be listed", select "to members only," and "Do not add new guests to the contacts list" Note: About that last item: we get billed at a higher rate when we exceed a certain number of contacts. Until we have a reason to carry all those non-member contacts, there is no reason to carry their data and the liability associated with it.
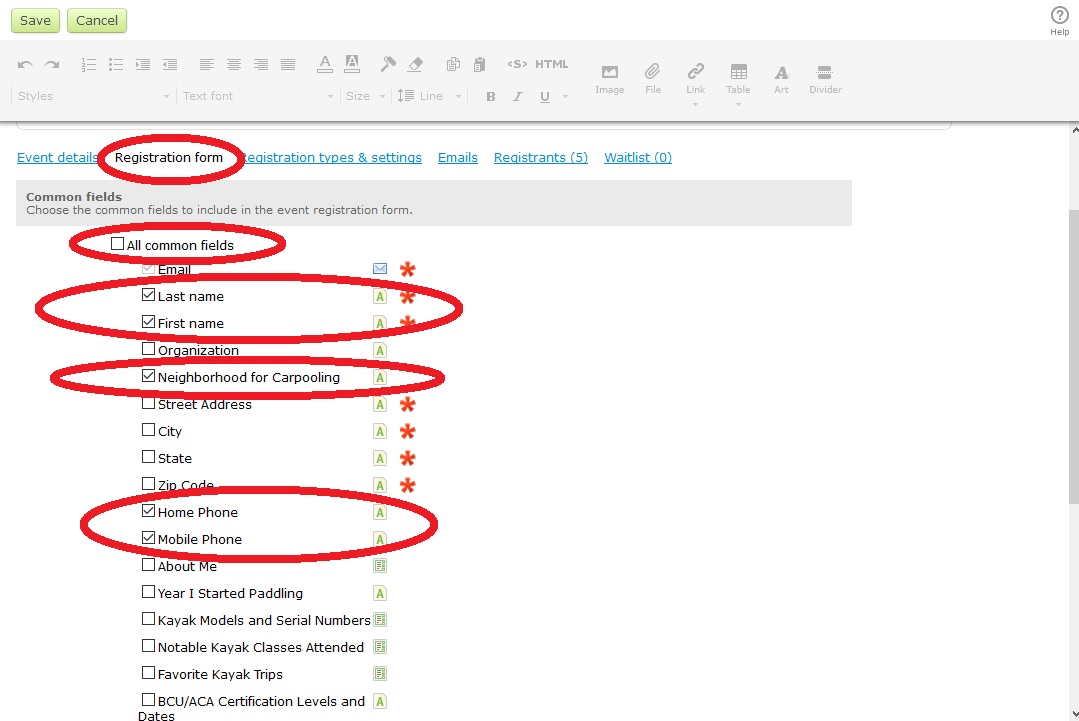
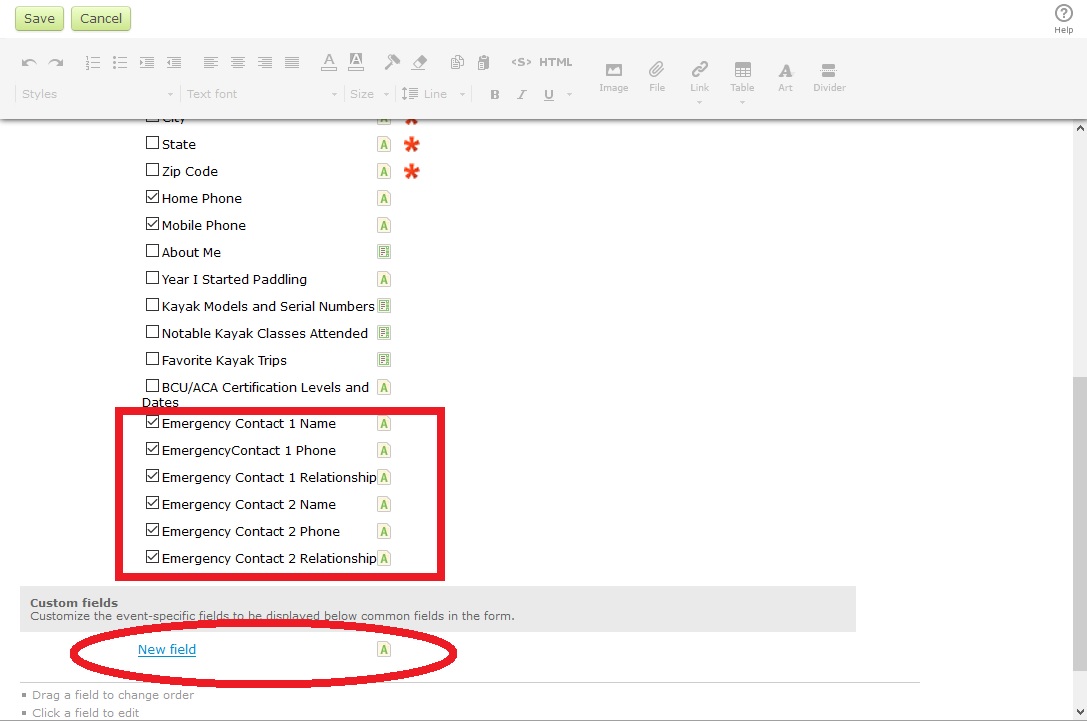
8. Set what Registrant Data to e-mail to the Organizer: Click on the "Registration Form" tab, de-select "All common fields," and then make sure only the following are checked: first and last name, neighborhood for carpooling, home and mobile phone, and emergency contact information. NOTES:
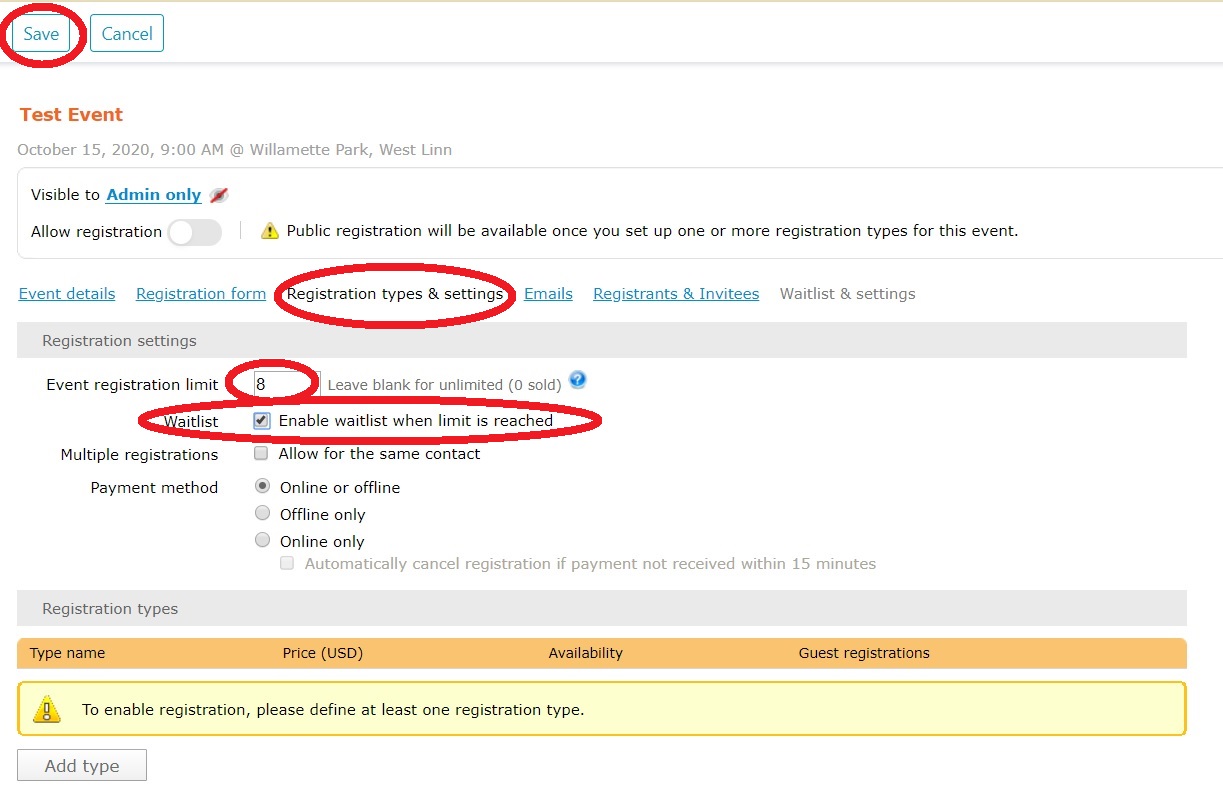
9. Define how many can attend your event, and what happens when you go over the limit: Click "Registration types and settings", then enter the size of the class/trip requested by the organizer in the box next to "Event Registration Limit." Then click "Enable waitlist when limit is reached." Now click "Save" in the upper left.
10. Set up the different types of registrations possible for this event: Check the notes below to see if you have a special type of event, then click "Add type" at the bottom of the screen if appropriate. You will get something like the below. To enable cancellation, check radio button at the bottom . You can limit how late cancellations can be made by adding a number to the "days before start of event" box. Leaving it blank allows cancellations at any time.
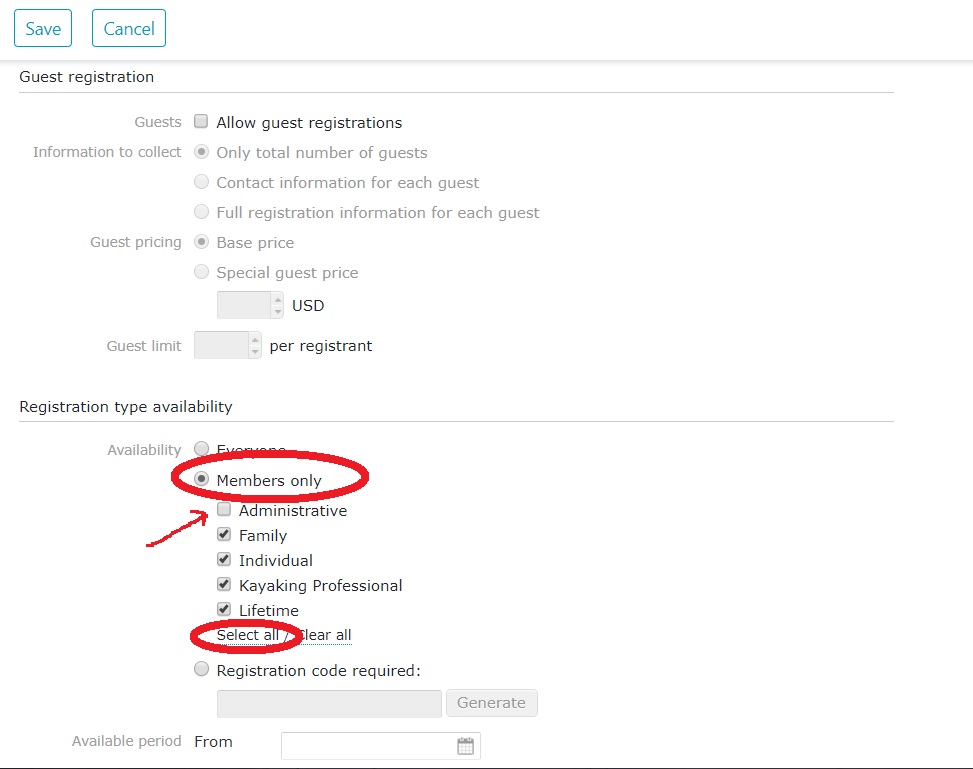
Then scroll down and select "Members only" and "Select All" to allow all types of members to attend. Then uncheck "Administrative" (so that administrators have to sign up for events using their real named accounts).
Now click "Save" Notes:
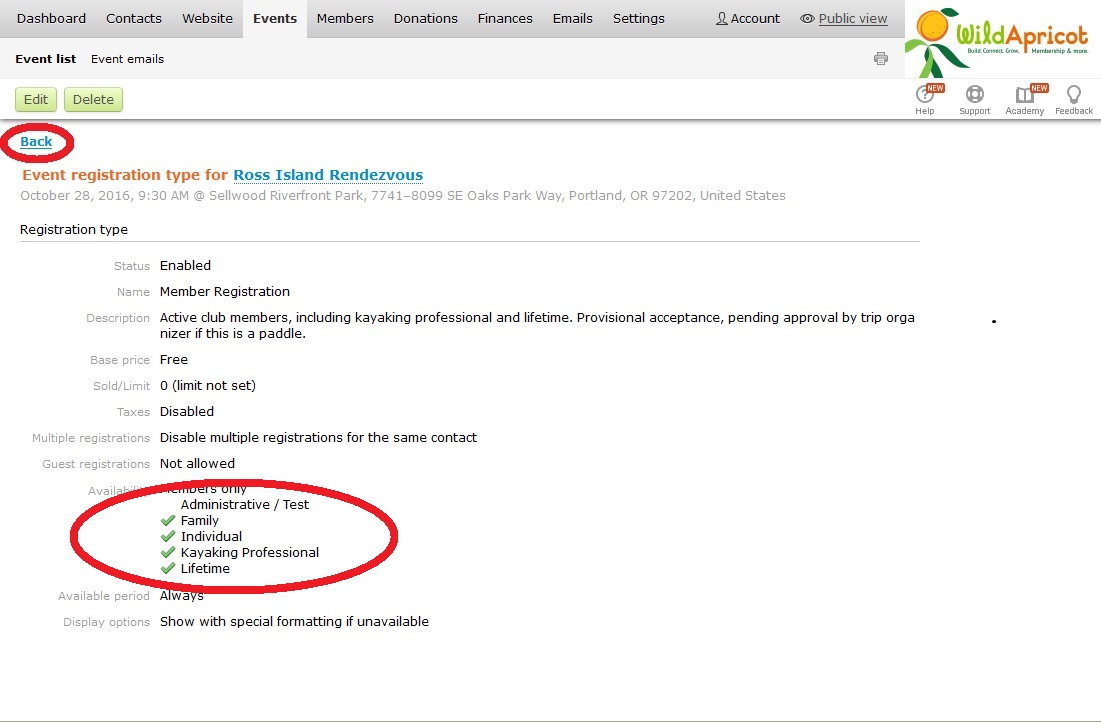
11. Verify Registration Type: You will be shown the "registration type" you have just created. Fix it if you need to by clicking "Edit" and going to the previous step. Move on to the next step clicking "Back"
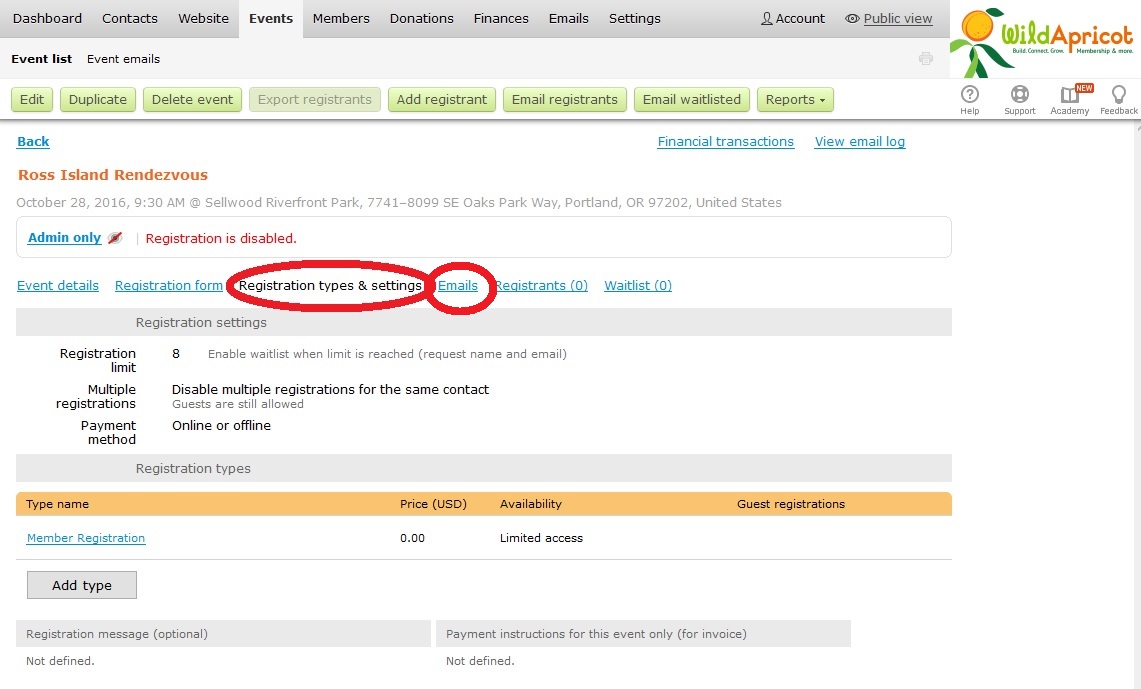
12. Done with Registration Types: OK, we now know what types of people can attend the trip/class. Now click on "Emails" NOTE: To allow different types of people to register, with different fees, repeat the above steps for each type of registrant (for example, one type of registration for Members, and another for Guests).
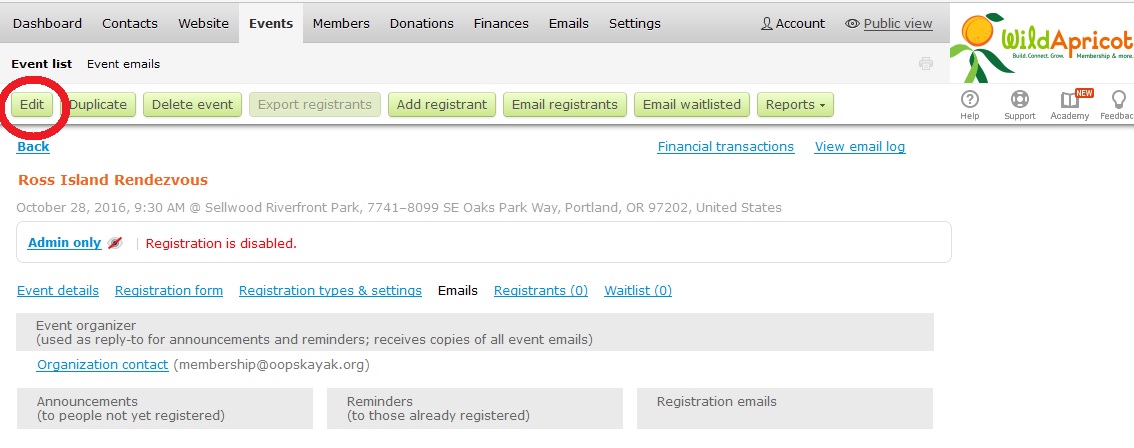
13. Edit the E-mails Page: In the new page that appears, click "Edit"
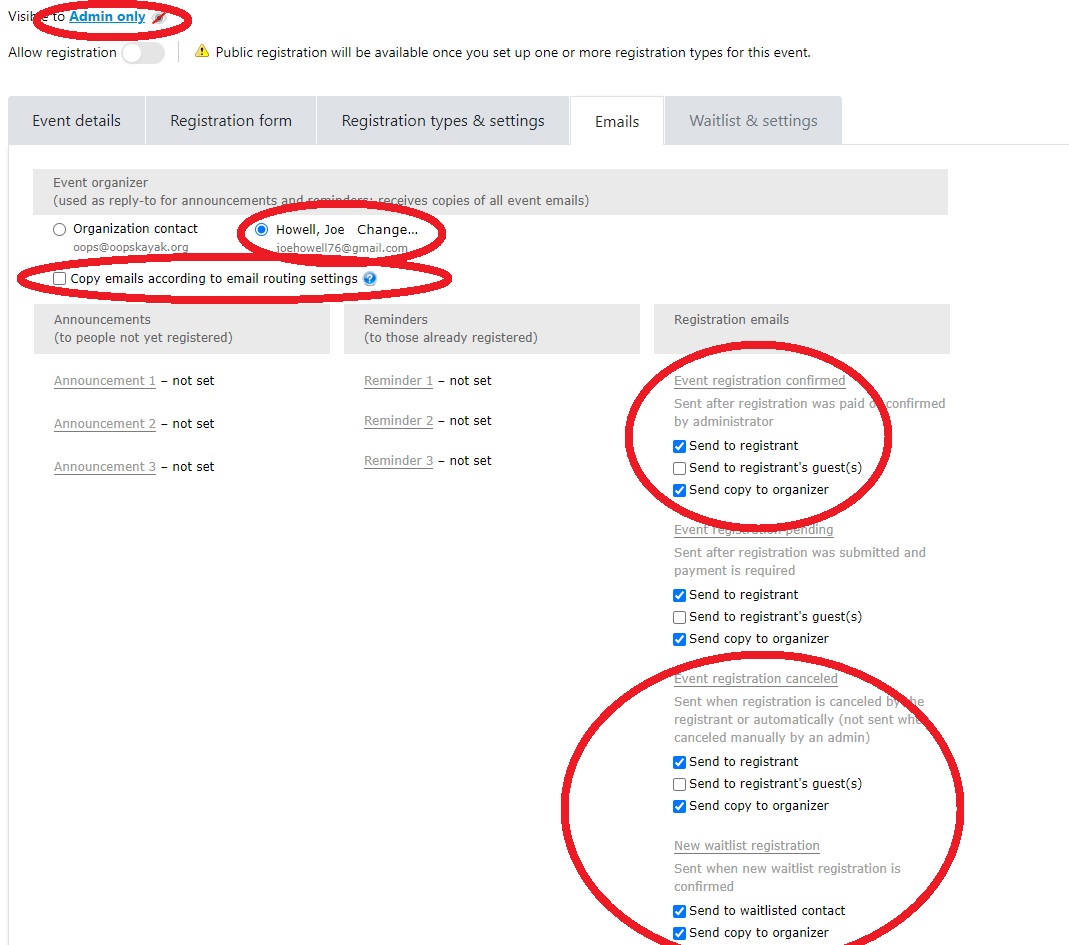
14. Set the Event Organizer and E-mails: Under the area "Event organizer," change the selection from "Organizer contact" to the selection which shows your name. Now click "Change" and find the organizer's name in the membership list and select it. The trip organizer's name should now show be listed for the "Event Organizer". Just below that, make sure the "Copy emails according to email routing settings" box is not checked. Make sure the "registration e-mails column" has all boxes associated with "Event registration confirmed," "Event registration cancelled," and "New waitlist registration" checked (you can ignore the "guest" fields as our events rarely have guests).
15. Edit Waitlist Settings: From top menu, go to “Waitlist and settings”. In “Information to collect” area, select button for “All event registration information". If you want to enable the waitlist to automatically fill open registrations after cancellations, go to “Waitlist management” area and select “Automatic registration”. Now click on "Admin only" in the upper left.
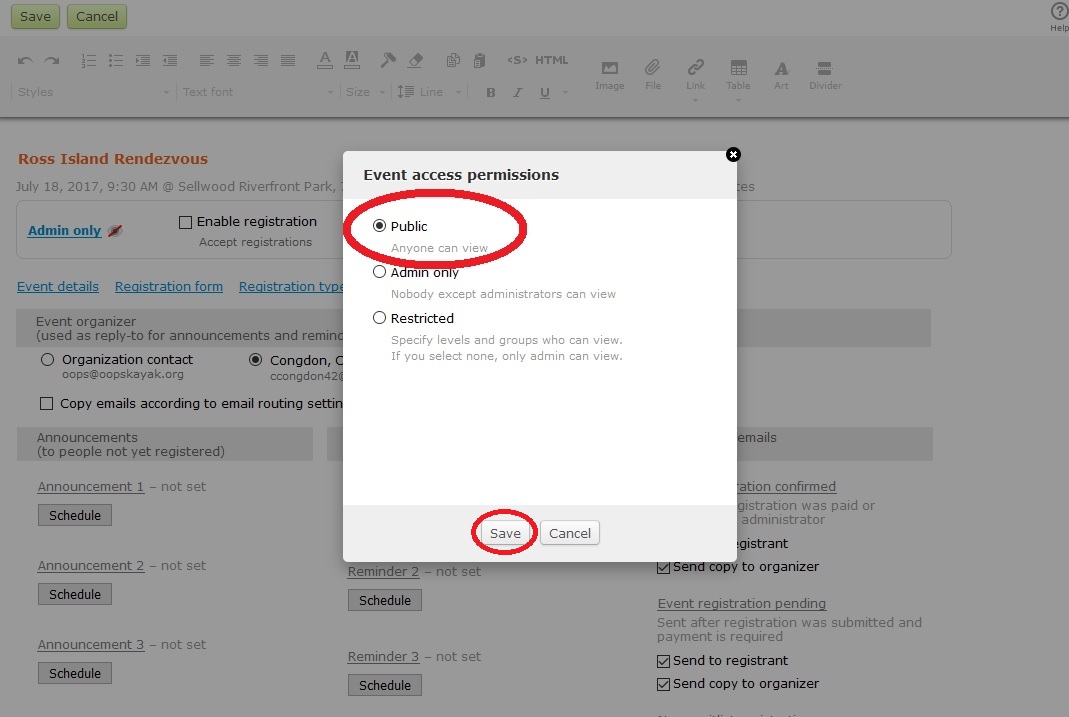
16. Make the Event visible to Members: In the pop-up, click on "Public," and then click "Save."
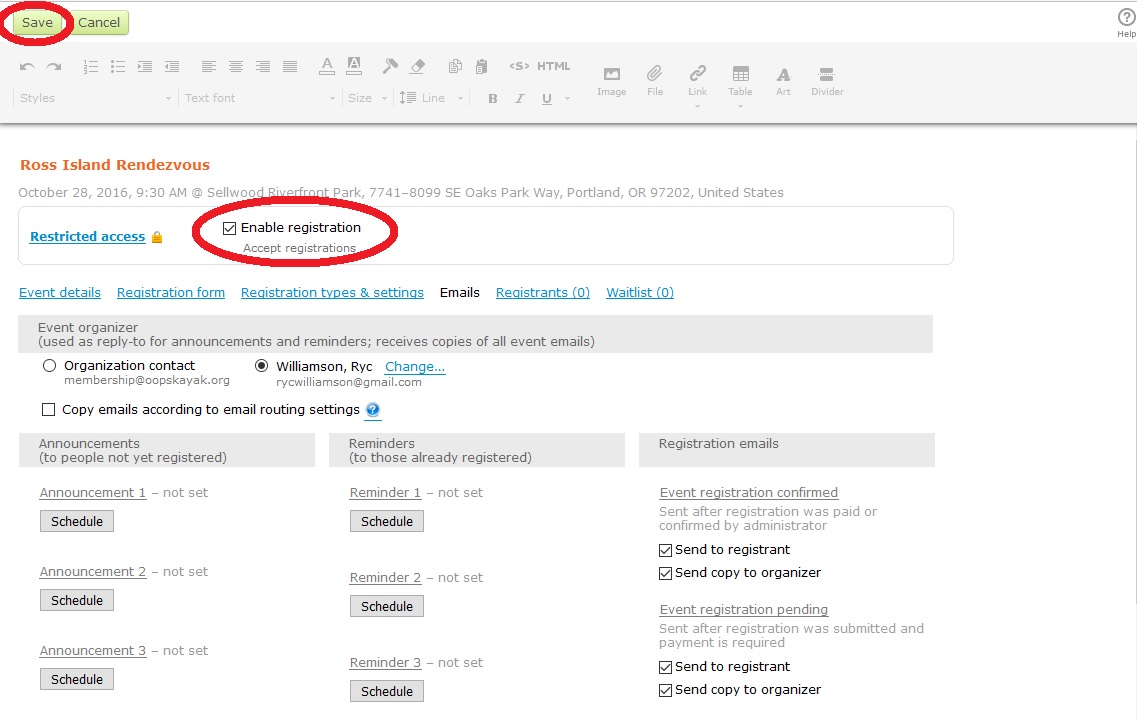
17. Enable Event Registration: Almost there! To post the trip on the calendar, click "Enable registration" and then "Save"
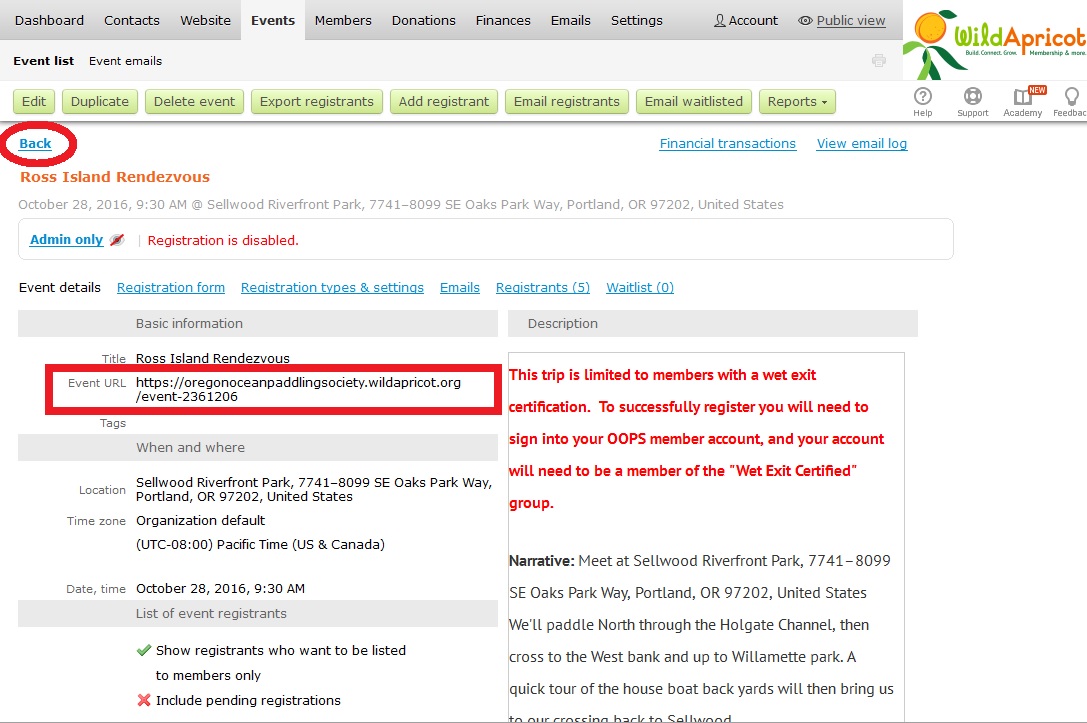
18. Copy Event URL and You Are Done with Event Setup: Click on "Event Details." You are looking at a screen showing the set up event. Copy the "Event URL" for use when sending out in your announcement of the event, and click "Back". Notes:
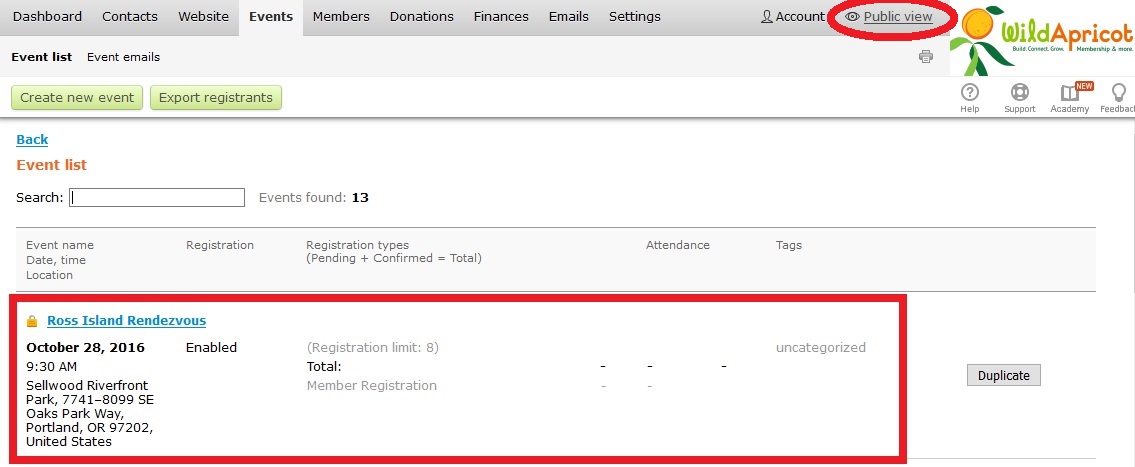
19. Verify Event on Event List: You are now back to the "Event list" page, and your new event shows up at the top of the list. You can further edit the event by clicking on its name. Now, let's see how the members will see the new event by clicking on "Public View."
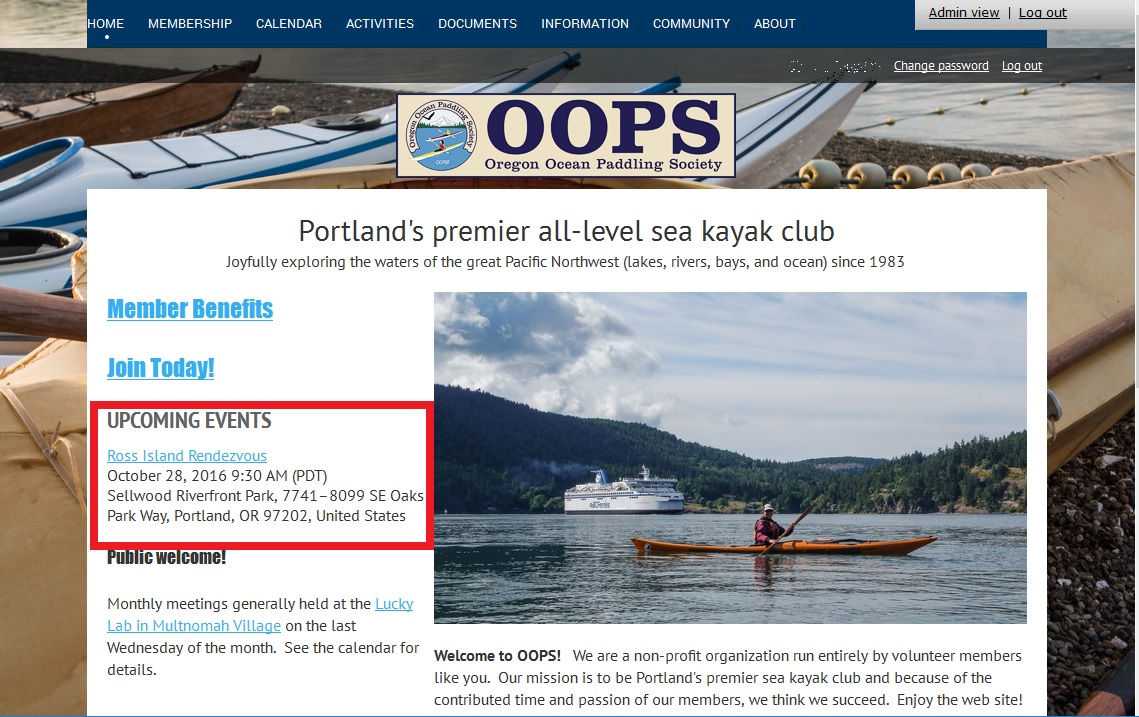
20. Verify Event on Home Page: Look, the new event is now listed under "Upcoming Events" on the homepage!
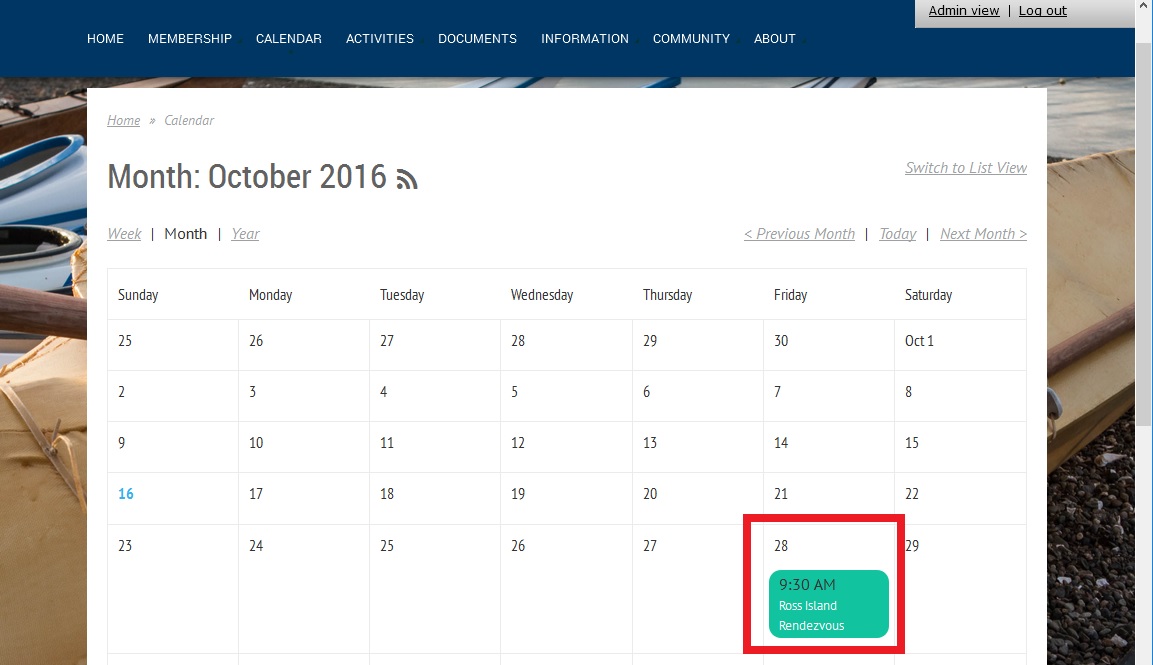
21. Verify Event on Calendar: And, as you would expect, it also appears on the calendar
22. Create a Topic for this Trip in the Trips Forum: On the website menu, navigate to "Community" and "Forums" and click on the "Trips Forum". Then click on the Green "Create Topic" button. Go to the document containing the text from the spreadsheet you created in step 3, and copy/paste everything from "Narrative" to "Rating Comments" into the body of the topic text. Please do NOT leave the Organizer's name, e-mail, and phone number in this description - that's only for you, the Event Coordinator, in case you have questions/concerns about the proposed event. Give the new forum topic the title you gave the event in step 6, plus the date of the Paddle (in this example "10/28/16 - Ross Island Rendezvous"). Once you are done, click "Create" to create the new topic. NOTE: Please start the event description with the following text (edit as appropriate):
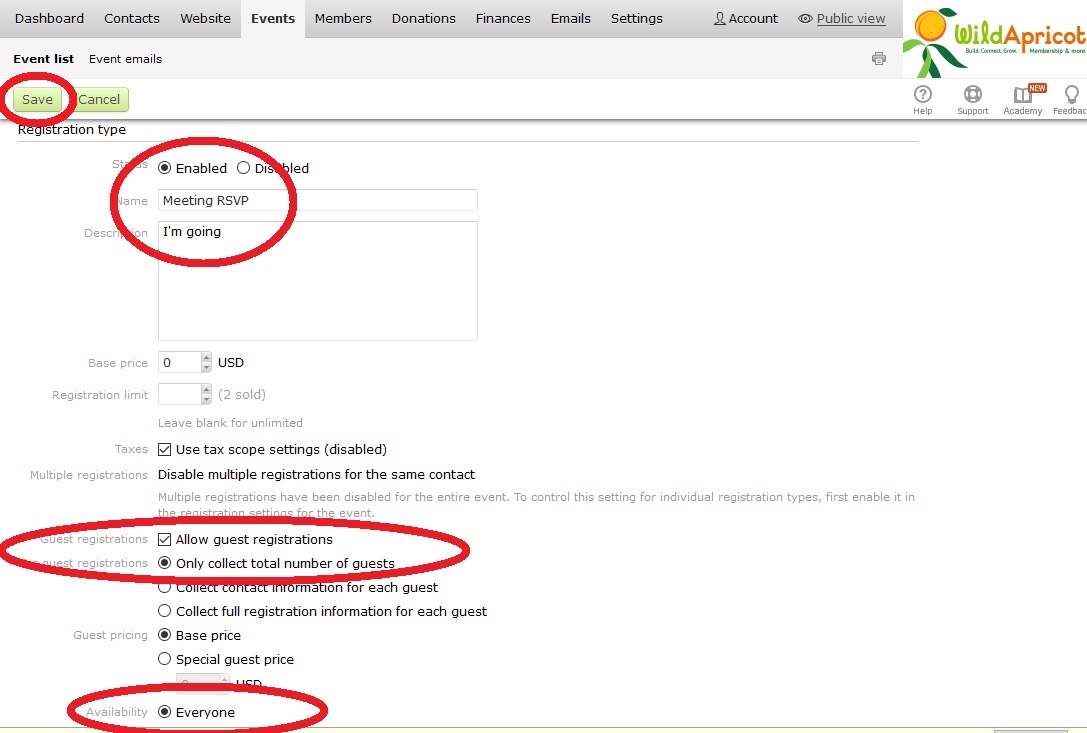
23. Announce the new Event: You are done with Wild Apricot for the moment! Log out if you wish, go to your favorite e-mail program, and announce the new event using the "event URL" you copied in step 18. You may also want to set up a forum topic for this event, so attendees can chat about carpooling, and people can post photos after the event. 24. Get the Organizers to Sign up for their trip: You can use your god-like powers to sign up the organizers for the trip or, better yet, remind the organizers to sign up for their own trip before you announce it. Special Cases1. Announcements or Events that do not use our Registration System: These are pretty simple. Follow steps 1-7 to set up the event details, then skip to step 14 to set up the event organizer and e-mails. On step 16, make the event public and click "Save" in the Upper Left. Skip registration entirely and go to step 18 to capture the event's URL for your announcement.2. Events that are open to members and non-members but use an RSVP: This is the same as case 1, except here we will create a special registration type which simply lets us count who is coming, and gives them an e-mail in their mailbox to let them know they registered. Click "Add Type" (see step 10), select "Enabled", enter the text "Meeting RVSP" under "Name," and "I'm going" under the description. Then select "Allow guest registrations," "Only collect total number of guests," and make this event available to "Everyone". Now click "Save". Do not create any other registration types for this sort of event.
3. Big Events: These are set up pretty much the same as a class or trip. The big difference is that you will specify an end date in step 6, you may create sub-sessions in step 7, and you will want to create custom fields on the registration form in step 8. In step 10 you may also want to create multiple registration types (event only, event+tent, event+tent+car). Note that you can limit the number of each type of registration sold. See Wild Apricot Help for more details (and we can create additional "how to" information if you need it). |